Showing posts with label Camping. Show all posts

Wednesday, August 8, 2012

Crescent Puff S'mores

Crescent Puff S'mores

2        cans (8 oz each) Pillsbury® refrigerated crescent dinner rolls
16      large marshmallows
2  to 3 (1.2 oz each) milk chocolate candy bars, broken into squares
1/2     cup butter or margarine, melted
1        cup graham cracker crumbs (about 14 squares)
  • 1 Heat oven to 375°F. Spray 16 regular-size muffin cups with cooking spray. Separate dough into 16 triangles.
  • 2 For each snack, place 1 marshmallow on shortest side of triangle. Top with 2 squares of chocolate candy. Starting with shortest side of triangle, fold corners of dough over marshmallow and chocolate, then roll to opposite point, completely covering marshmallow and chocolate; pinch dough to seal well.
  • 3 Dip snacks in or brush with melted butter; roll in cracker crumbs to coat. Place in muffin cups.
  • 4 Place pans on sheet of foil or cookie sheet (to catch any spills); bake 15 to 20 minutes or until golden brown. Immediately remove from muffin cups; serve warm.

Tuesday, August 7, 2012

Oaxacan Grilled Corn Cost per serving: 60¢

Oaxacan Grilled Corn

Leave a couple of inches of stalk on the end of each ear of corn to make a good handle. Pull off a piece of the husk and use it to tie up the rest decoratively, as shown.

8 ears fresh corn, with husks
  • 3 tablespoons unsalted butter, melted
  • 2/3 cup mayonnaise
  • 1 tablespoon chili powder
  • 1/2 cup grated Parmesan
  • 2 limes, cut into wedges
  • Salt and pepper
  • Preparation

    1. 1. Pull down corn husks and remove silk. Place husks back over corn and soak in large bowls filled with cold water for 30 minutes.
    2. 2. Preheat a gas grill to medium. Drain corn on paper towels and pat dry, pull down husks and brush kernels evenly with butter. Place husks back over corn and tie ends with kitchen twine to keep in place. Arrange corn flat on grill with string ends away from direct heat and cook, turning often, until tender, 20 to 25 minutes.
    3. 3. Cut away twine and pull down husks. Spread mayonnaise on each ear, then sprinkle with chili powder and Parmesan. Serve with lime wedges and salt and pepper for seasoning.

    Melon-Pineapple Salsa Cost per serving: 98¢

    Melon-Pineapple Salsa

    For a refreshing twist on salsa, try this recipe which incorporates fruit. It gives whatever you serve it with a tangy burst of flavor.

    3 cups diced ripe yet firm cantaloupe, from a 3-lb. melon $
    Click to see savings
  • 2 cups diced fresh pineapple, from a 2-lb. pineapple
  • 1 red bell pepper, seeded and diced $
    Click to see savings
  • 1/2 red onion, diced
  • 1 tablespoon grated fresh ginger
  • 1 small jalapeño, seeded and minced
  • 2 tablespoons lemon or lime juice
  • 1/4 cup chopped fresh mint leaves
  • 2 tablespoons olive oil $
    Click to see savings
  • Salt and pepper
  • Preparation

    1. In a large bowl, mix melon, pineapple, bell pepper, onion, ginger, jalapeño and lemon or lime juice. Stir well, cover and chill for at least 30 minutes or up to 6 hours. Just before serving, stir in mint and oil and season with salt and pepper. Serve cold.

    Roasted Tomato Salsa Cost per serving: 87¢

    Roasted Tomato Salsa

    To get the best taste, squeeze the tomatoes after roasting to rid them of some of the bitter seeds.

    8 to 10 medium plum tomatoes, about 2 lb., halved lengthwise
  • 1 red bell pepper, quartered and seeded $
    Click to see savings
  • 2 medium jalapeños, halved lengthwise and seeded
  • 1/2 small onion, chopped $
    Click to see savings
  • 2 cloves garlic, chopped
  • Salt and pepper
  • 1 teaspoon cumin
  • 1/2 cup packed fresh cilantro
  • Preparation

    1. 1. Preheat broiler to high; set a rack 4 inches from heat source. Arrange tomato halves cut side down on a broiling pan. Broil, watching carefully and turning pan as needed, until tomatoes are blackened and charred, about 10minutes. Transfer to a plate and let cool.
    2. 2. Place bell pepper and jalapeños on broiling pan; broil until blackened and charred, 7 to 10 minutes. Remove to a bowl, cover tightly with plastic wrap and set aside for 10 minutes. Peel pepper and jalapeños, but leave blackened skins on tomatoes. Coarsely chop tomatoes, pepper and jalapeños.
    3. 3. Working in batches if necessary, combine cooked tomatoes, bell pepper and jalapeños with onion, garlic, 1/2 tsp. salt and 1/4 tsp. pepper in a food processor. Pulse briefly until coarsely chopped. (Do not overprocess. The salsa should be chunky.) Pulse in cumin and cilantro. Season with additional salt and pepper. Cover and refrigerate until ready to serve.

    Friday, August 3, 2012

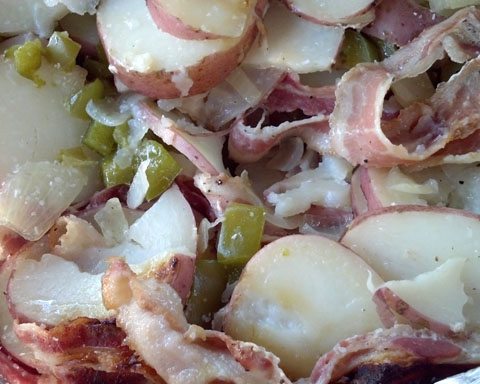
    Creekside Potatoes

    Creekside Potatoes


    Prep Time: 20 minutes
    Cook Time: 35 minutes

    Ingredients
    • 12 Slices Bacon
    • 6 Large Potatoes Sliced
    • Salt and Pepper
    • 2 Small Onions Chopped
    • 1 Large Green Pepper Chopped
    • Foil
    •  
    Instructions
    1. Place 6 slices of bacon on two long strips of foil (laid out to make a packet).
    2. Add half of the potatoes and season them with salt and pepper
    3. Add half the onions and half the peppers
    4. Repeat layering with remaining ingredients.
    5. Close foil to create packet and grill lowered onto coals for 20 minutes.
    6. Flip and grill for additional 15 minutes.
    For more food and fun, visit GOODEnessGracious.com

    Tuesday, July 31, 2012

    3 Ways To Cook Clams & Mussels Like A Pro

    WineIf you’re looking for easy meal ideas or impressive appetizers and starters, clams and mussels fit the bill perfectly. Beginner cooks can prepare these with confidence and they make an impressive, tasty dish with little effort.
    Here are three different ways to cook them (steaming, oven cooked and grilling), including instructions for how to clean them. I’ve also added a few tips at the bottom for buying, storing and portion guidelines.
    Since the directions below apply to both clams and mussels, I’ll keep things simple and refer to them both as shellfish or mollusks instead of individually.
    Quick Notes:
    • These little guys aren’t a treat when overcooked, but it’s impossible to give a specific time for cooking (since it depends on mollusk size, quantity and even the cookware used). Cook just until shells pop open wide (that’s how to tell when they’re done).
    • When steaming, keep liquid at a minimum so the mollusks aren’t boiled. This is another instance where specific amounts are difficult to give since it depends on the pan or cookware size being used and the amount being cooked. But don’t worry, you won’t mess this up!

    How To Clean & Prep

    Washing
    • If you buy them pre-cleaned: Place the mollusks in a colander and rinse well with cold water.
    • If not pre-cleaned: Scrub with a stiff brush or scrubber under cool running water. Place them in a large bowl or pot then cover with cold water (you’ll want the water level a few inches above the top of the clams). Add approximately 2/3 cup of sea salt per 2 quarts (8 cups) water, then mix the water and clams with your hands to distribute salt. Allow to sit for about an hour then drain, rinse well to get rid of any loose grit and fill with a fresh batch of water, soak for another 20 minutes. Rinse and repeat again. This should be enough to get rid of any sand and grit.
    • Tip: Some add cornmeal to the salt water (about 1/2 cup per large pot) believing it helps encourage them to purge any sand they’re holding inside the shell.
    • Examine each shell and remove any strings of beard you see, simply pull off with your fingers or a knife. Pull back towards the hinge end.
    • Check for any cracked or damaged shells, toss them in the garbage.
    • Scrape off any barnacles with a knife.
    • There will likely be some in the batch with open shells, snap them smartly with your fingers or tap them against a hard surface. If they don’t close, throw them out (they’re likely dead).

    To Steam:

    • The secret to steaming is to use just a bit of liquid, use too much and you’ll boil the meat instead of steaming it.
    • Add enough liquid to cover the bottom of a deep pan or stockpot completely and then some (about 1/4″ deep), heat on medium to high heat. You can use water, white wine, beer, with even some fresh lemon juice and butter added. Tip: You can make a flavorful stock by first sauteing some chopped onions, minced garlic, chopped celery, herbs, etc., for a few minutes before adding liquid.
    • When liquid starts to boil, add shellfish. Cover with a tight fitting lid and cook until done.
    • How to tell when they’re cooked? The shells will open wide. Cooking time depends on the size of the shellfish and can be anywhere from 3 to 10 minutes.
    • After cooking: shells should be open, toss those that aren’t in the garbage.
    • What to do with the cooking liquid: it’s been flavored nicely with the clam liquor so why not use it! Add a large spoonful of butter or heavy cream, bring to a boil and cook for a few minutes to reduce. Pour over shellfish and serve.

    To Oven Bake:

    This is technically steaming since they’re cooked in sealed parchment paper pouches with a bit of liquid.
    • Preheat oven to 400°F with a baking sheet on the bottom rack so it gets nice and hot.
    • Take a sheet of parchment paper and add a handful of mussels or clams just off the center of the sheet.
    • Top with a bit of garlic butter, freshly squeezed lemon juice or a splash of white wine.
    • Fold over paper then seal all the sides by twisting and folding edges together to make a pouch, you’ll want the pouch to be roomy so there’s lots of space around the shellfish to hold the steam that will develop as well as hold the opened shells. Make sure seal is nice and tight to keep in the steam.
    • Place packets on hot baking sheet then cook until they are done and the shells are open (you’ll be able to tell through the paper).
    • To serve, simply cut open the packets and enjoy!

    To Grill:

    • Preheat grill medium to high heat.
    • Place cleaned mollusks directly on hot grill in a single layer, close cover and cook until shells are open (anywhere from 3 to 10 minutes depending on size). If any don’t open, simply move those to the grill’s hot spot in the center and cook a couple more minutes. If they still don’t open, toss them.
    • Another method: Heat a cast iron pan or a foil pan directly on grill. Add a good chunk of butter, water (or wine, beer), garlic, chopped scallions or whatever you like and close grill cover until liquid is heated. Spread mollusks in a single layer around the pan, close lid then cook until done (can be up to 10 minutes).
    • Foil packet method: Same idea as the parchment paper packets as mentioned above in the Oven Baked instructions, use heavy duty aluminum foil instead and add about a tablespoon of butter, drizzle with water and add a bit of minced garlic and chopped onion. Seal packet edges tightly making sure to leave room for the steam and open shells. Place on grill and cook a few minutes until shells have popped open (can be up to 10 minutes).

    Tips

    • When purchasing clams or mussels, take a good whiff of them and pass on any that have a fishy smell (a sign that they’re not that fresh).
    • Storage: Keep in mind these are live creatures so you don’t want to seal them up in containers or bags and suffocate them. Best if they’re not left sitting in water, simply pour the mollusks in a large bowl, cover with a damp dishtowel and refrigerate for a day or two until ready to cook.
    • How many clams to serve? About 1/2 pound per person (appetizer) or approximately 1 pound per person (main).
    • Don’t add salt when cooking, the mollusks will naturally add salt to the pan juices as they cook.

    Friday, July 27, 2012

    FROZEN BANANA BITES


    What you'll need . . .
    • 2 large bananas
    • 1/4 to 1/3 cup vegan chocolate chips
    • 1/4 to 1/3 cup natural peanut butter
    • Unsweetened coconut flakes

    Method . . .
    1. Set out a large plate or bowl with a piece of parchment or wax paper on it.
    2. Cut up the bananas into good-sized chunks. Each banana should give you around 5 to 6 pieces.
    3. Heat the peanut butter and chocolate chips in the microwave on high for about a minute. Then stir until smooth.
    4. Dip the banana pieces in the chocolate-peanut butter mixture. Lay them out leaving some space between them on the parchment/wax paper. Then when you've "covered" them all, use the remaining mixture to spoon over the tops (for even more chocolate-y goodness).
    5. Then sprinkle the unsweetened coconut flakes on top. Transfer to the freezer for about an hour until hardened.
    6. You can enjoy them like this (but they really aren't frozen yet -- and when they're frozen, the banana tastes like vanilla ice cream) . . . I suggest then covering with some plastic wrap (or really you can do all of this in some kind of Rubbermaid container) and let freeze overnight.

    Thursday, July 26, 2012

    Chocolate Bananas

    chocolate bananas campfire cooking
    Throw them on the campfire- delicious

    This campfire recipe was created by Elspeth Callendarwho was on the bush camping trip with us. It is a simple and delicious campfire desert.
    Take a banana, cut in half lengthwise and leave in the skin. Put small pieces of chocolate in between the two halves of banana. Wrap it up in foil and put it on the hot coals. They are cooked once the banana is soft and the chocolate has melted.

    Campfire paella

    recipes for campfire cooking paellaThis is a super-easy one-pan dish absolutely incredible on a cold night by the fire. Not only does it work really well cooked on a campfire, the woodsmoke will add to the flavour.
    While this version is for carnivores, you could replace the meat with firm tofu cubes; just make sure you pan-fry the tofu in hot oil with the onion, garlic, chilli, extra paprika, saffron and salt and pepper until golden, before adding other ingredients.
    Again, you’ll need a good-sized wok for this. Remember, the rice expands as it absorbs the liquid! This recipe will comfortably feed six hungry people.
    Ingredients
    • Good quality olive oil
    • Two medium-sized brown onions, diced
    • Six cloves of garlic, finely sliced
    • One large red chilli, deseeded and thinly sliced
    • One red capsicum, diced
    • Three chorizo sausages, chopped into chunks; cured is absolutely fine
    • Four chicken thighs, chopped into 1cm-thick slices
    • Smoked paprika
    • Two or three strands of saffron
    • Salt and pepper
    • 500g frozen prawns (which we bought before we arrived at the campsite and allowed to thaw in their packaging)
    • Two cups of Arborio rice (…which we couldn’t get, so we used sushi rice instead)
    • Four cups of good quality vegetable stock
    • Water in reserve
    Steps
    1. Drag out your coals close to the fire itself, and make a level spot for your pan. Heat the pan for a few minutes before dropping in a couple of good lugs of the olive oil.
    2. When the oil starts to sizzle, throw in the onions and let them sauté for five minutes or so.
    3. Once the onions have started to glisten, add the garlic and chilli. Let that sauté for another five to 10 minutes.
    4. Add the capsicum, letting it sauté for a couple of minutes.
    5. Add the chopped chorizo and chicken thighs; fry until the chicken is browned.
    6. Add the spices and salt and pepper, to taste. I use a lot of paprika – a good three tablespoons worth – because I like the smokiness.
    7. If you’ve got prawns, throw them in after the spices have had a couple of minutes in the pan. These are a bit of a luxury item when you’re camping…the recipe will work just as well without them, but they’re great to have if you can find a way.
    8. Add the Arborio rice and the stock. On a campfire, it’ll take at least half an hour over coals for the rice to absorb the liquid…keep stirring every couple of minutes or so to stop the rice sticking to the hot wok.
    9. You want the rice to lose any hardness, and the paella to take on a shiny, sticky consistency. Use the extra water if it turns out the stock isn’t enough to reach this point.
    This is great served with a bit of chopped parsley sprinkled over the top – but really, all you need is a bowl, spoon and an appetite.

    Thanks to YTravelblog.com

    Spaghetti Arrabiata

    spaghetti arrabiata

    This is a rich tomato sauce flavoured with garlic and hot chillies, which we bulked out with eggplant. You’ll need a large wok-style pan and a second pot for cooking the spaghetti.
    Feeds six.
    Ingredients
    • Good quality olive oil
    • Two medium-sized brown onions, diced
    • Four cloves of garlic, finely chopped
    • One large red chilli, deseeded and sliced into fine strips
    • 425g tin of crushed tomatoes
    • 700g bottle of passata (tomato puree)
    • Red wine
    • One eggplant, chopped into 1cm cubes
    • Fresh basil, hand-ripped into large shreds (not chopped)
    • Handful of kalamata olives (I prefer with seeds in, but you can use the seeded olives if you prefer)
    • Salt and pepper
    • Thin spaghetti
    • Parmesan cheese
    Steps
    1. Drag out your coals close to the fire itself, and make a level spot for your pan. Heat the pan for a few minutes before dropping in a couple of good lugs of the olive oil.
    2. When the oil starts to sizzle, throw in the onions and let them sauté for five minutes or so.
    3. Once the onions have started to glisten, add the garlic and chilli. Let that sauté for another five to 10 minutes.
    4. Empty the tinned tomatoes and passata into the pan, along with about a cup of red wine.
    5. Once that starts to bubble, add the eggplant, basil and olives. Add salt and pepper.
    6. Let the results simmer for at least half an hour. Remember, the flavour comes from the cooking time…the longer this sits on the campfire, the richer your sauce will become. You want it to reduce slightly, and for the eggplant to go really soft and take on the flavour of the sauce.
    7. About 20 minutes out from serving, get a pot of water into the coals to heat for the spaghetti. Once it’s simmering, add enough spaghetti to feed your crew – noting recommended cooking times on the packet.
    Serve this up with a few extra sprigs of fresh basil and shavings of parmesan cheese

    BBQ Potato Chip Burgers


      By

    Serves: 4
    Ingredients
    • 1 lb lean ground beef
    • 1 tbsp Worcestershire sauce
    • 1 tbsp soy sauce
    • 1 small white onion, minced
    • 1 cup crushed BBQ potato chips (I used Lay’s)
    • dash of salt and pepper
    Instructions
    1. Mix all ingredients together and form into patties, it doesn’t get much easier than that!
    2. Grill about 15 minutes, turning once.
    Notes
    Some people like to add egg to their burger recipe. This recipe can be made with or without egg

    ONION FLAT BREAD

    Picture of Grilled Green Onion Flatbread Recipe


    Read more about it at www.cooks.com/rec/view/0,174,132182-246194,00.html
    Content Copyright © 2012 Cooks.com - All rights reserved.
    1 cup warm water
    1 teaspoon salt
    1 tablespoon sugar
    1 tablespoon olive oil
    freshly cracked black (or mixed) pepper
    1/2 ounce dried yeast dissolved in 1 T. warm water
    12 ounces flour
    1 egg, beaten lightly
    coarse sea salt or kosher salt
    chopped onion, for sprinkling

    This flat bread bakes up wonderfully on a pizza stone set on the grill. Be sure that the stone is well heated before placing the onion bread on to bake. A pizza peel or the back of a pizza pan sprinkled with corn meal (so that it slides off easily onto the stone) can be used as a surface for preparing the flat bread while the grill or oven heats up.Stir salt, sugar and olive oil into warm water. Dissolve yeast in one tablespoon of warm water and add to mixture. Add flour gradually, mixing and kneading until smooth and elastic. Cover, and allow to rise overnight in a warm place, free from draft.
    The next day, knead the dough and divide into balls about the size of a tennis ball. Roll each one out to about 1/2" thickness.
    Brush with egg yolk diluted in two tablespoons water and sprinkle with coarse salt and chopped onion, and finally, coarsely cracked pepper. (For an extra kick, hot pepper flakes can also be sprinkled on lightly). Pierce the dough several times with a fork so that it will remain flat.
    Bake on a lightly floured baking sheet in a 400°F oven for about 20 minutes until onions are brown and crust is crisp and golden.
    Variation: Top pizza with a combination of black oil cured olives, sliced onions and anchovies. Drizzle with olive oil. Sprinkle with Parmesan cheese, if desired (cheese is entirely optional)!

    Submitted by: CM

    ONION CHEESE LOAF BREAD


    1 lb. loaf frozen bread
    1 c. finely grated Cheddar cheese
    3 med. green onions, finely chopped
    2 tbsp. poppy seed
    1 tbsp. melted butter

    Thaw dough. Make 3 lengthwise cuts almost to bottom of loaf. Mix cheese, onion, and poppy seeds. Spread 1/3 of mixture down each slit. Press dough together to form loaf again. Place in lightly greased bread pan. Brush with melted butter. Let rise 1/2 inch above sides. Bake at 350 degrees for 25 to 30 minutes.

    GRILLED PIZZA WITH PEARS AND GOAT

    Goat Cheese, Pear & Onion Pizza Recipe
    2-3 medium size pears, sliced
    3 tablespoons extra-virgin olive oil
    1 3-ounce package of Prosciutto (suggested La Quercia)
    1 10-ounce tube refrigerated thin pizza crust dough
    2 3-ounce log soft fresh goat cheese (La Bonne Vie
    3 tablespoon chopped, fresh basil
    1/4 teaspoon dried crushed red pepper

    Preheat clean grill to medium.Unroll pizza dough baking sheet, forming 9x12-inch rectangle and brush with olive oil. Place dough olive oil side down on grill. While dough cooks, brush pears with oil olive and place pears on the grill 2-3 minutes each side. Brush top side of pizza dough with olive oil and flip the pizza. Scatter prosciutto and pears onto dough. Top with goat cheese.
    Grill pizza 5-7 minutes or until crust is crisp. Sprinkle with basil and crushed pepper.

    Submitted by: heather

    Sunday, July 22, 2012

    BBQ Baked Beans and Sausage


    Turn baked beans into an easy main dish by adding chicken sausage and collard greens. Check the sodium amount on your canned beans to make sure it's not too high. Giving the beans a good rinse before adding them to the recipe can shed up to 35 percent of sodium.


    Total Time: 30 min

    Ingredients
    • 1/2 cup(s) prepared barbecue sauce (see Tips & Techniques)
    • 1/2 cup(s) water
    • 2 tablespoon(s) tomato paste
    • 1 tablespoon(s) molasses
    • 1/8 teaspoon(s) salt
    • Freshly ground pepper, to taste
    • 1 tablespoon(s) canola oil
    • 1 medium onion, chopped
    • 4 cup(s) chopped collard greens, (about 10 ounces), tough stems removed
    • 9 ounce(s) cooked chicken sausage links (about 3 links), halved lengthwise and sliced
    • 2 can(s) great northern or navy beans, rinsed (see Tips & Techniques)

    Directions
    1. Whisk barbecue sauce, water, tomato paste, molasses, salt, and pepper in a medium bowl.
    2. Heat oil in a large saucepan over medium heat. Add onion and collard greens and cook, stirring occasionally, until the collards are wilted, 3 to 5 minutes. Add sausage and cook, stirring, until beginning to brown, about 3 minutes more.
    3. Reduce heat to medium-low; add beans and the sauce mixture to the pan. Gently stir to combine, cover and cook until heated through, about 3 minutes.

    Tips & Techniques
    Shopping tip: Check the sodium of your favorite barbecue sauce-some can be quite high. This recipe was developed with a sauce containing 240 mg sodium per 2-tablespoon serving.

    Note: While we love the convenience of canned beans, they tend to be high in sodium. Give them a good rinse before adding to a recipe to rid them of some of their sodium (up to 35 percent) or opt for low-sodium or no-salt-added varieties. (These recipes are analyzed with rinsed, regular canned beans.) Or, if you have the time, cook your own beans from scratch.

    Friday, July 20, 2012

    Bowl of Worms Anyone????

     Bowl of Worms Anyone?

    Create tasty, edible worms. This recipe is simple and great for Halloween, April Fool's, or anytime you feel like snacking on wormy goodness! If you can make jello, then you can make these cool looking worms.

    Ingredients
    2 packs (3 oz) Raspberry jello
    1 pkg unflavored gelatin (for extra firmness)
    3/4 cup whipping cream
    3 cups boiling water
    15 drops green food coloring
    100 flexible straws (or enough to fill your container)
    Tall container (1 quart or 1 liter carton of milk)


    Directions
    1) Combine gelatin in bowl and add boiling water.

    2) Let it cool to lukewarm and then add the whipping cream and 15 drops green food coloring.

    3) Gather your straws (don't forget to flex them out) and put them in the container. It's important that the straws have a tight fit so the jello stays in the straws. For this reason, a 1 liter carton may be better; you will probably get longer worms since there is a tighter fit. If you have a bigger container, a rubber band around the straws is helpful. Or you could just add more straws to fill the container.

    4) Add the gelatin mixture to the straw-filled container and let it set until firm.

    5) There are multiple ways you can remove the worms from the straws. You can roll a rolling pin over the straws and squeeze them out or you can hold the straws over warm water. The worms will slip right out.

    And voila! Jello worms are served.

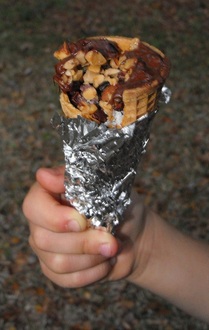
    Campfire Cones

    By Chef Jessica....
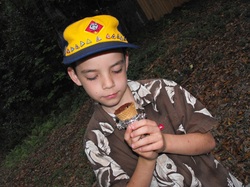
    campfire conesI love camping! I love planning our menu and cooking while on a camping trip. S’mores are the proverbial camping dessert and I enjoy them but they can be really, really, really messy. I know, that is part of the fun! But sometimes the combination of marshmallow goo, sand, leaves, and the great outdoors is just a little too much for me. I thought up this yummy treat as an alternate option for our family in hopes that it will help cut back on some of the mess.
    You have two choices for when to make these–you can assemble everything, wrap the whole thing in foil, and then just pull it out and place it on the campfire when you are ready to go; or you can bring the “fillings” and let everyone assemble the cones as they choose there by your campfire and then wrap and cook.

    For each camper you will need:


    • campfire cones recipe
      1 ice cream cone (I prefer sugar cones)
    • 1 piece of foil, big enough to wrap the cone
    And an assortment of the fillings of your choice. They can include but are not limited to:
    • Chocolate chips
    • Butterscotch morsels
    • White chocolate morsels
    • Walnuts
    • Peanuts
    • Almonds
    • Toffee pieces
    • Mini marshmallows
    • Brown sugar
    • Coconut
    • Cocoa nibs (raw chocolate)
    • Banana pieces
    • Dried fruit


    You essentially create your own custom candy bar!
    Allow each camper to design their cone with the fillers of choice in layers. Wrap securely with foil and place over heat near campfire or on grill to allow the chocolates to melt. Unwrap and enjoy.
    For a variation you can take waffle cone bowls and fill them with the fresh fruit of choice. Try these delicious combinations:
    • Fresh strawberries and chocolate chips
    • Peaches, white chocolate, and almond slivers
    • Apple slices, cinnamon, raisins, brown sugar, and butter
    • Bananas, butterscotch morsels, and brown sugar

    Wednesday, July 18, 2012

    Campfire Chicken

    The great thing about this recipe is that if you have some picky eaters, you can make custom packets… but in our house we have a “you pick” rule for things like this… meaning you pick around what you don’t like… sorry Aunt Lou ;P

    I chopped up one large zucchini

    1 large green bell pepper- chopped

    1 small head of cabbage… you guessed it, chopped. Notice a trend yet?

    Red potatoes… 6 or so- quartered.

    1 large onion and 6 cloves garlic– again, chopped.

    3 ears of corn cut in half

    8 oz sliced mushrooms

    Then take two large strips of foil and lay them down. You are going to want to make enough room to close it up after you put all the food in. Don’t worry if you misjudge… it isn’t nice to be all judgey anyways now is it ;) You can always add more foil.

    Add 1/2 stick of butter to the foil… sliced into pieces.

    Add a pound of chicken tenders (note– 1/2 lb shown here… adjusting recipe because it needed more chicken).

    Add potatoes to taste and season well.
    NOTE: All veggie amounts added at this point are up to your personal taste. I split my veggies evenly between two packets.

    Pile on your veggies and season well again.

    Close up foil and add more as needed to make packet water-tight– just make sure to remember which side of the packet the butter and chicken are on.

    Place your grate down on the coals and place foil packets chicken side down.

    Use extra foil to cover top of grill if it does not have a hood. Grill chicken side down for 20 minutes, flip and cook for 10 more minutes.

    Pull the packets from the grill and check the chicken side to make sure chicken is done and veggies are tender.

    Ring the dinner bell and watch out as they dig in!

    Wednesday, July 11, 2012

    S' mores Pie


    Toasty, melty marshmallows, indulgent chocolate and flaky pastry - ultimate dessert!

    Blogger Brooke McLay from Cheeky Kitchen mixes up a simple S'mores Pie that brings all the flavors of the campfire right into your kitchen!


    S'mores Pie


    1        Pillsbury® refrigerated pie crust, softened as directed on box
    1 1/2  cups milk chocolate chips (9 oz)
    1 1/2  cups dark chocolate chips (9 oz)
    1        pint (2 cups) whipping cream
    2        cups large marshmallows
    2        cups miniature marshmallows
    1/2     cup sweetened condensed milk (not evaporated)
    • 1 Heat oven to 450°F. Bake and cool crust as directed on box for One-Crust Baked shell.
    • 2 In large microwavable bowl, place milk chocolate chips, dark chocolate chips and 1/2 cup of the whipping cream. Microwave uncovered on High 30 seconds; stir. Repeat until chocolate chips are stirred smooth.
    • 3 Place remaining 1 1/2 cups cream and the chocolate mixture in large bowl. Beat with electric mixer on high speed until thick. Spread in cooled pie shell. Refrigerate 2 hours.
    • 4 Just before serving, set oven control to broil. Cover pie filling with large and miniature marshmallows. Drizzle with sweetened condensed milk. Broil with top about 5 inches from heat leaving oven door open slightly and watching so it does not burn. Remove pie as soon as marshmallows are golden brown. Serve immediately.
     
    Garnish this pie with crushed graham crackers and extra chocolate chips for that extra "s'moresy" kick!
    Lend a little bit of sweetness to your pie crust by pressing the edges into sparkling sugar just before baking.