Showing posts with label Copy Cat Meals. Show all posts

Friday, August 31, 2012

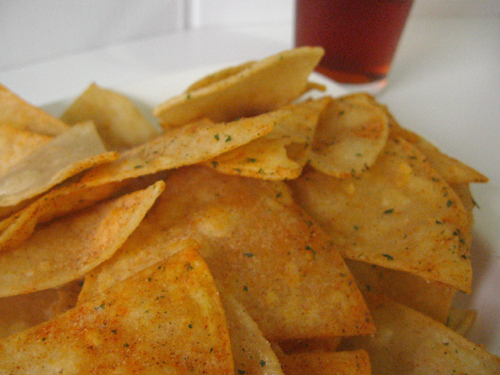
Kind of Cool Ranch Doritos

This image courtesy of macheesmo.com

Kind of Cool Ranch Doritos

This is the first in a series of posts I’m working on called “The Junk Food Junkies.” My goal in these posts is to try to replicate some favorite junk foods in my kitchen. In general, I like to eat fairly healthily, but sometimes you need some snack food. I would rather make that snack food than buy it.
How to make doritos
These are suprisingly ranchy.
Enter Doritos. Not only one of my favorite snack foods, but the favorite snack food of my Macheesmo taste-tester (aka girlfriend). One day I was working through a bag of Cool Ranch when I looked over at the ingredient list and said, “Hey. I think I can make these!”
What I was worried about obviously, was the spice. The chips I knew I could meet if not beat. But the spice… that was going to be tricky. I had an obvious place to start though:
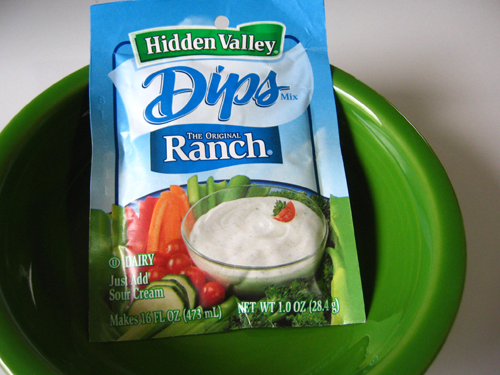
Ranch for doritos
This stuff is strong!
I poured this stuff into a bowl and thought it might just work as is. Boy was I wrong. The plain spice pack is incredibly strong. It is bitter and makes your eyes almost water. So I had to find a way to “dilute” the spice pack so it wasn’t so strong. This was the recipe I ended up with:
Kind of Cool Ranch
-
One Ranch Dressing spice pack
- 2 to 3 Tablespoons season salt
- 1 Tablespoon Paprika
- 1 Teas. Garlic Powder
Helpful Equipment:- Cast Iron Skillet
- Candy/Deep Fry Thermometer
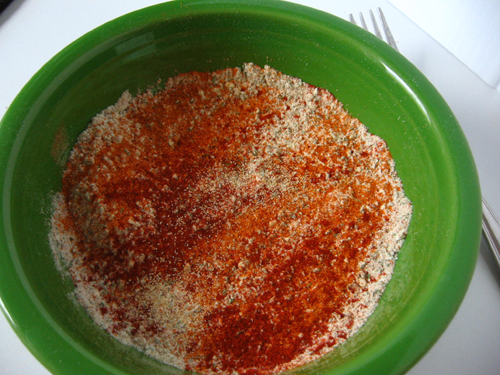
Mix that up and it should be much less bitter and more salty which is what you want.
Seasoning for cool ranch
Spice Dilution
Next, let’s make some tortilla chips. Homemade tortilla chips are one of my favorite treats because A) they are cheap B) they are easy C) they are better than anything you can buy in the store.
I like to use white corn tortillas cut into sixths.
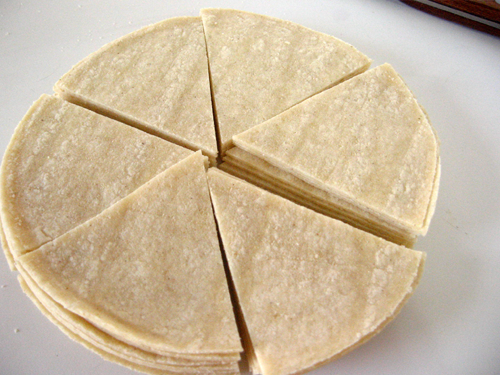
corn tortillas
Cheapest Chips on the block.
Now you can bake these at 400 degrees with just a brushing of oil on them and that is fine. Personally, if I’m eating snack food, I want these guys fried. I’m throwing down with Doritos here. Frying is the way to go.
I filled my trusty cast iron skillet with about 1 1/2 inches of corn oil and let it heat up to 350 degrees. You know when it is the right temperature because your tortilla will float and bubble immediately. If you want exact results though, I recommend using a deep fry thermometer for the oil.
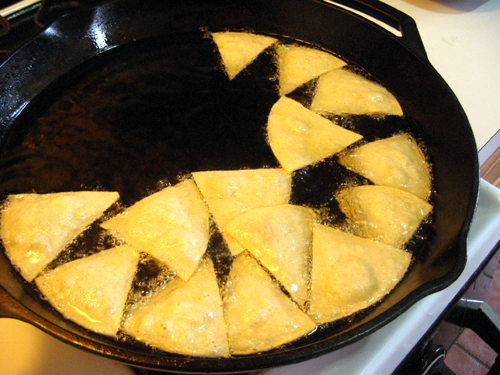
Frying chips for doritos
Looking good guys.
The chips are pretty easy to make, but it might take a few times to get it right. The biggest problem I have is if you don’t have the oil hot enough or you don’t let them cook long enough on both sides, you end up with a tortilla chip you can bend. NOT APPETIZING.
The one trick I’ve learned is that the chips will be crispy when they stop bubbling. The reason being that all the water is out of the tortilla which makes it stop bubbling and also super-crispy. Silent tortillas are crispy tortillas.
When they are done, take them out and put them on a paper towel to drain off some of the oil and sprinkle that awesome seasoning on them immediately.
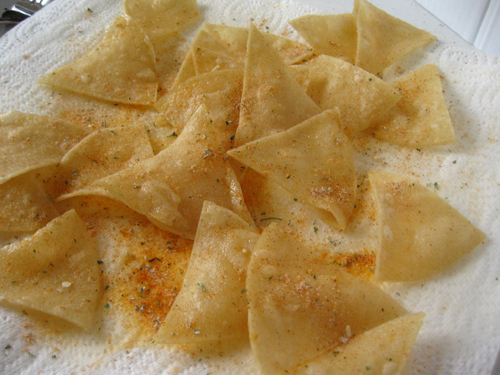
Seasoning doritos
Season now!
I would recommend starting light on the spice as it is pretty intense. Just give a little sprinkle and then try them while they are hot. How many of you can say you have had Doritos while they are hot? Well, these are awesome hot!
Final chips
Doritos ain't got nothing on me.
I definitely did not use all of that spice that I mixed up earlier. I probably used about half of it on a batch of maybe 60 chips

Homemade Doritos Tortilla Chips

Homemade Healthy Doritos

This image courtesy of thejoyofcleaneating.com

Who said junk food had to be unhealthy? Feel better about your snacking habits with this recipe for Homemade Healthy Doritos! This homemade junk food recipe is both vegan and gluten-free so just about everyone will be able to gather around, and enjoy!
Ingredients for 1 serving of chips:
Preparation:
  1. Preheat your oven to 350 degrees.
    Cut your tortilla shell into 8 equal pieces
  2. Cut your tortilla shells into 8 equal sized triangle pieces.
  3. Lay your triangles out on a baking tray. (I line mine with non stick foil for easy clean up!)
    Lightly spray or brush your triangles with olive oil and sprinkle with the crushed crouton mixture, flip and repeat on the other side
  4. Lightly spray or brush your triangles with olive oil and sprinkle with the crushed crouton mixture, flip and repeat on the other side.
    Place in the oven for about 10-12 minutes
  5. Place in the oven for about 10-12 minutes. You will need to keep a close eye on them for the last few minutes as they can go from almost done to burnt very quickly!
  6. Once your tortilla chips are done remove them from the oven and allow them to cool for about 5 minutes. They crisp up wonderfully after cooling down.
Nutritional Info:
Makes 1 serving.
Serving size 8 chips.
Nutritional info will vary greatly depending on the type of bread used in the croutons and tortilla shells used.
Notes:
You can easily double or even triple this recipe to make a larger batch of chips to have on hand.
Leftover doritos can be stored in an airtight container at room temperature for 2-3 days.

Thursday, August 23, 2012

Copycat Olive Garden Breadsticks

Copycat Olive Garden Breadsticks

This image courtesy of readableeatables.blogspot.com


Dough:
1 1/2 cups warm water
2 Tbs sugar
1 Tbs yeast
1 Tbs salt (yes, the recipe calls for 1 Tablespoon, which I use every time and they turn out great.)
2 Tbs butter, softened
4-5 Cups flour


Topping:
3 Tbs butter melted
sea salt
1 tsp garlic powder

For the dough, pour the water into a stand mixer with the sugar and yeast, let that sit and froth for about 10 minutes. Add salt, butter, and 2 cups of flour. Mix the dough on low. Add the rest of the flour a half cup at a time, until dough scrapes the sides of the bowl clean. Mix the dough about 5 minutes on medium speed, until its soft and easy to work with.
Let the dough rest in the bowl until doubled in size, about 1 hour and then roll it out. Roll the dough out into a long log, spray a knife with cooking spray and cut the dough into 12-14 pieces. Roll those pieces into about 6 inch long snakes. Spray 2 large cookie sheets with cooking spray, ( I usually only use one) and lay the breadsticks out leaving about 2 inches between each one.
Place them in the oven with the temperature turned to 170 degrees. Let them rise for about 15 minutes, or until doubled in size.( I have also let them sit at room temp until they are doubled in size and then bake them in the oven)
Once risen, brush them with the 1 1/2 T of melted butter and sprinkle them with salt. Now preheat the oven to 400 degrees and bake them for 12-14 minutes or until golden brown. While they are baking combine the rest of the melted butter with 1 tsp garlic powder. When the breadsticks are golden brown, remove them from the oven and brush them with the butter/garlic mixture.

Tuesday, August 21, 2012

Olive Garden Toasted Ravioli

Ingredients

  • 1 (16 oz.) package meat-filled ravioli
  • (fresh or frozen, but thaw if frozen)
  • 2 eggs, beaten
  • 1/4 c. water
  • 1 tsp. garlic salt
  • 1 c. flour
  • 1 c. plain bread crumbs
  • 1 tsp. Italian seasoning

Instructions

Mix water with eggs and beat well; set aside. Mix Italian seasonings and garlic
salt with the bread crumbs and set this aside. Measure flour in bowl and set
aside. Heat vegetable oil in deep fryer or skillet to 350 degrees for deep frying.
Dip ravioli in flour then in egg wash then in bread crumbs and carefully place in
hot oil. Fry until golden, remove from oil and drain. Serve with your favorite
marinara sauce.

Monday, August 20, 2012

Giant Little Debbie Swiss Roll

Giant Little Debbie Swiss Roll

By: Liz from Cooking by Moonlight

Chocolate Sponge Cake (or Chocolate Jelly-Roll Cake) Recipe

Ingredients
yields 1 1/2 sheet pan sponge cake
1/4 cup dutch processed cocoa powder
1/3 cup cake flour
1/4 t. salt
1 t. baking powder
1/2 t. instant coffee
4 eggs, yolks and whites in separate bowls
1/2 cup sugar

Directions
1) Line a half-sheet pan first with cooking spray or vegetable shortening then with parchment paper across the bottom of the pan. The cake sticks very easy so it is important to make sure the sheet is lined properly or you will end up with a torn cake.

2) Pre-heat the oven to 425 degree.


3) Sift together the dry ingredients (cocoa, flour, salt, baking powder, and coffee) and place in a small bowl to the side.

4) In a mixer with the whisk attachment whip the egg whites until they are at soft peaks. This is also sometimes referred to as wet peaks. You will know they are ready when you remove the whisk and the egg whites form a Dairy Queen ice cream cone like curl. If they fall quickly and don't create the curl keep going... if they stand straight up in the air... I'm sorry... start over :(

5) In a small mixing bowl mix the egg yolks and sugar together until they become pale yellow. Add the dry ingredients to the egg yolk mixture. The batter will be stiff - don't worry it should be.

6) Mix in half the egg white mixture until completely incorporated and the batter becomes easier to work with. Finally fold in the last half of the egg whites. Don't over-stir the second half.

7) Pour onto the greased and parchment paper lined pan. Use a spatula to spread the batter evenly so you do not end up with a big cake on one side and a cracker like cake on the other. Because the egg whites were whipped it is important *not* to bang the pan in order to get the batter to settle. Simply use a spatula to spread. Bake for 6-8 minutes or until the cake is sponge-y to the touch.


8) Remove cake from the oven and allow it to cool in the pan for a few minutes. Tip the cake over, remove the cake, pull off the parchment paper, and roll up into a tea towel to cool. This gives the cake form memory and will keep it from cracking after you have filled it with icing and roll it up. Allow the cake to cool for 20 minutes.

9) After the cake has cooled spread the Little Debbie Creme Filling (recipe below) evenly across the entire cake. Roll the cake up (remove the towel!!) like the pictures above.

10) Place the cake on a wire cooling rack set on top of the half sheet pan. Pour the chocolate ganache glaze over the top of the cake and allow to cool. If you are a big chocolate lover thten after the first layer of glaze has cooled go ahead and pour another on top for a thicker layer of icing.

Slice the cake to serve and pretend you are back in the 5th grade with the best lunch box treat there ever was! :)


Little Debbie Creme Filling Recipe


Ingredients
yields 1 batch
1 stick butter, softened
1/4 cup vegetable shortening
1 small (8oz) jar marshmallow creme
1 t. vanilla
1/4 t. salt
1 cup powdered sugar

Directions
1) Whip together the butter, shortening, creme, vanilla, and salt. Slowly add the sugar. If you are in a humid climate you may need to add up to an extra 1/4 cup powdered sugar to get the right texture.


Chocolate Ganache Glaze Recipe

Ingredients
yields 1 batch
1/2 cup heavy cream
4 oz (about 2/3 cup) dark or milk chocolate roughly chopped (or chocolate chips)

Directions
1) Heat the cream over medium heat until it begins to simmer. Quickly remove from heat and pour in the chocolate. Stir with a whisk until all chocolate has melted. 

Copycat Dairy Queen Ice Cream Cake


By: Kim from Relative Taste

Ice Cream Cake

Ingredients:
  • 2 1/2 cups crushed Oreos
  • 1/2 cup melted butter
  • 1/2 cup sugar
  • 1/4-1/2 gallon chocolate ice cream, slightly softened
  • 1/4-1/2 gallon vanilla ice cream, slightly softened
  • 8 ounces Cool Whip
Hot Fudge Sauce:
  • 2 cup powdered sugar
  • 2/3 cup semisweet chocolate chips
  • 12 ounce can evaporated milk
  • 1 stick margarine
  • 1 teaspoon vanilla

Directions:
Combine 2 cups Oreos with margarine and sugar.
Press into 9×13 pan.
Freeze 15 minutes.
Spread layer of each ice cream on top and freeze for 3 hours.
Combine first 4 hot fudge sauce ingredients in saucepan and bring to a boil for 8 minutes.
Remove from heat and stir in vanilla.
Cool to room temperature.
Spoon sauce on ice cream and freeze until firm.
Spread Cool Whip on top and sprinkle with Oreo crumbs.
Freeze 3 hours.

Little Caesar's Crazy Bread


1-10oz. tube Pillsbury pizza dough
2 tablespoons (1/4 stick) butter
1 teaspoon garlic salt
Kraft 100% grated Parmesan cheese for topping

Preheat the oven to 425 degrees F.
Unroll the dough on a cutting board. Position it lengthwise (longer from left to right than top to bottom). With a sharp knife, cut the dough in half, and then in half once more so that you have 8 even strips of dough.
Being careful not to stretch the dough, place each strip on a lightly greased baking sheet and bake for 6 to 8
minutes, or until the top just turns golden brown.

While the dough bakes, melt the butter (on the stove or in the microwave on high for 15 to 20 seconds), then
add the garlic salt and stir until it dissolves.
Remove the browned dough from the oven and with a pastry brush or spoon spread a coating of garlic butter
over each piece.
Sprinkle a generous amount of Parmesan cheese on each!

Source: Todd Wilbur's Top Secret Recipes

Saturday, August 18, 2012

Panda Express Cream Cheese Wontons/Puffs

Copycat Panda Express Cream Cheese WontonsThis knockoff Chinese restaurant side dish is out-of-this world rich and satisfying. Copycat Panda Express Cream Cheese Wontons are a great combination of sweet and savory. They're easy to put together and serve to a large group. Forget takeout, you can make these instead.


Panda Express Cream Cheese Wontons/Puffs

Author: CopyKat Recipes
 
Prep time: 10 min
Cook time: 15 min
Serves: 10
You can enjoy biting into a creamy and crunchy wonton made from your own kitchen. Enjoy Panda Express Cream Cheese Wontons at home.
Ingredients
  • 1 8 ounce package cream cheese - softened
  • 1 1/2 tablespoons scallions sliced thin
  • wonton wrappers
  • shortening
Instructions
Heat enough vegetable shortening or cooking oil to fill 2 to 3 inches in a medium sized cooking pot. If you have an electric fryer, you can use your electric fryer. Cream together cream cheese and scallions together. If desired a touch of garlic powder may be added for additional flavor. Spoon approximately 1 teaspoon of cream cheese mixture into wonton, and fold wonton.
Fold wonton by brushing a little water over all of the edges of the wonton skin. Fold wonton diagonally unto a triangle. Be sure to seal all of the edges completely, this will keep the filling from running out of the wonton when being cooked. Next take the two furthest ends and press and twist those together. You may need to tack together the two end pieces by adding a little water.
When the oil is heated, you can use a thermometer and test to see that it is 350 degrees, or you may test with a small piece of wonton skin. If the wonton skin bubbles immediately when dropped into the hot oil, it is ready. Drop only 4 or 5 pieces into the hot oil. After about 1 minute the wonton will begin to brown, it will now brown rapidly, remove it when it is lightly browned. If your oil is shallow, you may need to flip over the wonton before serving 

Wednesday, August 15, 2012

Ruth's Chris Steakhouse Crab Cakes ( copycat recipe)

Ruth's Chris Steakhouse Crab Cakes
1 pound lump crab meat
1 egg
2 tablespoons chopped fresh parsley
3 tablespoons cracker meal (5 or 6 saltines, crushed)
1/2 cup mayonnaise
2 tablespoons Creole mustard
1/2 teaspoon ground black pepper
1 1/2 tablespoons olive oil
1 tablespoon finely diced red bell pepper
1 tablespoon finely diced green bell pepper

Pick through crab meat, removing any shells.

In a medium bowl, whisk together egg and parsley. Add cracker meal, mayonnaise, mustard and pepper; stir until thoroughly blended. Carefully fold in crab, trying not to break up crab pieces. (Mixture may be refrigerated up to 2 days before cooking.)

Preheat oven to 400 degrees F. Place a heavy baking sheet with sides or a shallow ovenproof skillet in the oven to heat.

When pan is hot, drizzle surface with olive oil. Using a 1/4 cup measure, scoop crab mixture onto hot pan and flatten slightly. Bake about 10 minutes, until golden brown and hot on the inside.

Arrange 2 crab cakes on a serving plate; garnish with diced bell peppers.

Serve immediately with your favorite sauce.

Yield: 12 crab cakes.

NOTE: Baking (rather than the usual pan-frying) makes these soft-textured crab cakes easy to handle, but they are rather pale on top. For a better appearance, bake on the uppermost oven rack, or bake 10 minutes, turn the crab cakes, then bake 2 minutes more.

Copy Cat Fried Pickles

Fried pickles


Vegetable/canola oil
20 ounces of kosher dill burger sliced pickles
3/4 cup pickle juice
1/2 cup ranch dressing
1/2 teaspoon tabasco sauce
1 egg
1 cup flour
1/4 cup cornstarch
2 cups panko bread crumbs
1 ranch seasoning packet
Ranch Dip for dipping

DIRECTIONS

  1. Open the jar of pickles and reserve 3/4 cup juice. Set aside.
  2. Drain any remaining juice and arrange the pickles in a single layer on a cookie sheet to dry. I used paper towels to help absorb any moisture. You want the pickle slices as dry as possible so that the coating adheres to it.
  3. In a large bowl, whisk together pickle juice, ranch dressing, tabasco sauce, egg, flour, and cornstarch. Whisk until well combined.
  4. In a shallow dish (I used a cake pan), combine panko bread crumbs and ranch seasoning packet.
  5. Dip each dried pickle into batter, allowing the excess batter to fall, then dip each pickle into the panko mixture and set aside. Continue dipping and coating each pickle.
  6. Heat 1-1.5 inches of oil in a large skillet. When the oil has reached about 360 degrees, carefully place a few pickles in the skillet at a time and cook for about 3 minutes, or until both sides are crispy and brown.
  7. Remove the cooked pickles from the oil, and place on paper towels to drain.
  8. Continue cooking pickles in batches until all are cooked.
  9. Serve pickles immediately with homemade ranch dip.
This recipe and picture adateped from CenterCutCook.com

Monday, August 13, 2012

Copy Cat Homemade Oatmeal Creme Pies


Oatmeal Creme Pies


Cookie mix                                                                      Cream Filling for middle

1 ¼ cups butter softened                                              ½ cup soft butter

1 cups brown sugar packed                                           1 t vanilla

½ cup sugar                                                                        2 cups powdered sugar

1 ½ cup flour                                                                      1-2 T whipping cream

3 cups oats                                                                                         

1 egg

2 t vanilla

1 t soda

½ salt

1\4 cinnamon

For the Cookie mix:

Preheat oven to 375.  Beat butter, sugar till creamy add egg, vanilla mix well.  Lightly spoon flour into dry measuring cup and level with a knife.  Combine flour, soda, salt, cinnamon in a bowl.  Stir add oats and mix well.  Add butter mix and blend well.  Drop by rounded tablespoons 2” apart on baking sheet lined with parchment paper.

Bake at 375 for 10 min.  Leave in pan to call 2-3 mins.  Put on cooling rack to cool all the way.

Add 1T cream filling between 2 cookies.


For the cream filling:

Combine all in medium bowl.  Beat on low till mixed well.  Then beat on high till light and fluffy.

Oatmeal Creme Pies are always a welcome sight in any kid's lunch box, and now you can make them in your own kitchen! This Little Debbie Oatmeal Creme Pies recipe makes perfect little snack cakes to get you through the day.

Homemade Cheetos ( copy cat Cheetos )


Homemade Cheetos


So, you want that recipe do you? Ok, here it is:
Homemade Cheese Balls
1 c. shredded cheese (or dairy-free/vegan cheese or try nutritional yeast)
1/2 c. whole wheat flour (or GF mix)
1/4 c. softened butter or earth balance
1/2 t. ground mustard.
Pre-heat oven to 400 F. Mix all ingredients. I suggest using a pastry cutter or your (clean) hands :) . Place on ungreased cookie sheet with an inch in between each one and bake for about 15 minutes. Serve warm if you desire or cool. :)
Makes: ~12- 1 inch balls
Note: Next time I am going to try making these smaller as they do spread a bit in the oven. I think they might be crisper (and more like the original) that way.
Tired of making the same old recipes? Try out this recipe for Homemade Cheetos to liven up your cooking routine! These Cheetos cheese balls are the perfect snack to give your kids when they come home from school!
By: Ariana Anderson from The Frugally Rich Life

Pepperoni Pizza Puffs ( copy cat pizza rolls )


Pepperoni Pizza Puffs

No need to stop by the grocery, these Pepperoni Pizza Puffs are better than the store-bought brand. The freezer aisle has nothing on this delicious take on Totino's Pizza Rolls. This homemade copycat recipe is crafted with pepperoni, mozzarella and Parmesan cheeses. Surprise your kids with this delicious after school snack.


Pepperoni Pizza Puffs adapted from Everyday with Rachael Ray and Cassie Craves
  • 3/4 cup flour
  • 3/4 teaspoon baking powder
  • 1 tablespoon Italian seasoning
  • pinch of salt (my addition, optional)
  • pinch of red pepper flakes (my addition, optional)
  • 3/4 cup whole milk
  • 1 egg, lightly beaten
  • 1 cup shredded mozzarella cheese
  • 1/4 cup grated Parmesan cheese
  • 1 cup cubed pepperoni
  • 1/2 cup store-bought pizza sauce
1. Preheat the oven to 375 degrees. Grease a 24-cup mini-muffin pan. In a large bowl, whisk together the flour, baking powder, Italian seasoning, salt and red pepper flakes (if using) ; whisk in the milk and egg. Stir in the mozzarella, Parmesan and pepperoni; let stand for 10 minutes.
2. Stir the batter and divide among the mini-muffin cups. Bake until puffed and golden, 20 to 25 minutes.
3. Meanwhile, microwave the pizza sauce until warmed through. Serve the puffs with the pizza sauce for dipping.
NOTE: All my batter did not fit into the 24-mini muffin pan. So I made a full size muffin with the leftover batter. Some pans are larger than others so you may not have have an issue.

Friday, August 10, 2012

Homemade Cinnamon Toast Crunch

Homemade Cinnamon Toast Crunch

By: AikoVenus from Shin's Vegan Lovin'

3/4 cup of White Whole Wheat
1/4 or 1/2 cup of Raw Sugar
1/8 tsp Turmeric
1/4 tsp Sea Salt
1 tbl Cinnamon
1/4 tsp Nutmeg
2 tbl Chia Seeds with cold water
3 squeezes Agave Nectar
1 tsp of Canola Oil
Enough (gluten-free) Oat Milk to mix

Mix all of the ingredients together with a spoon, adding the wet ingredients last, then knead about 40 times, let the dough rest for about ten minutes and then roll the dough out as thinly as you like. The more thickness it has, the less crispness and the less time it will last on the shelves. Cut your squares, slather with oat milk and sprinkle on cinnamon and sugar. Bake at 350 degrees for about 25 minutes or until fully browned and crisped then fix your bowl of cereal and enjoy.

Thursday, August 9, 2012

Homemade Crunchwrap Supreme from Taco Bell (copycat recipe)

Homemade Crunchwrap SupremeThis tasty treat recalls one of Taco Bell's best. The Homemade Crunchwrap Superem recipe is the perfect opportunity to master a Mexican-inspired copycat. The combo of nacho cheese, lettuce tomato and sour cream is irresistible.


Homemade Crunchwrap Supreme

Ingredients:
6 large flour tortillas
6 small corn tortillas (or tortilla chips)
1 pound ground beef
1 package taco seasoning
sour cream
nacho cheese (or shredded Mexican blend cheese)
shredded lettuce
diced tomatoes

Directions:
Brown ground beef in a skillet, then add taco seasoning (according to package directions). Set aside.

Bake the corn tortillas in the oven at 400 degrees for a couple of minutes, until they are golden and crunchy.

Microwave the flour tortillas, one at a time (because they cool off quickly), for about 10 seconds to warm them up; this will make wrapping easier. You could also warm them up in the oven; just wrap them in aluminum foil and heat them up for about 10 minutes at 350 degrees.

Lay out the flour tortilla. Spoon some of the seasoned beef into the center of the tortilla. Top with some nacho cheese, or shredded cheese. Place the crunchy corn tortilla on top of the cheese/beef; spread a dollop of sour cream on top of it, then toss on some diced tomatoes and shredded lettuce.

Starting with the bottom of the tortilla, fold the edge up to the center. Continue doing this in a clockwise or counter-clockwise movement until all of the tortilla is folded over, and the filling is entirely enclosed. If your filling isn't entirely enclosed and you have an open spot, simply cut out a circle from another flour tortilla and place it on the exposed area, then wrap the tortilla again.

Spray a frying pan with cooking spray. Carefully place the Crunchwrap, seam-side down, in the pan. Press with a spatula and cook on medium-low heat, for about 3 minutes, until the bottom is nice and brown. Flip it over and cook for another 3 minutes.